
There are many ways to stretch the mighty dollar at home. Using coupons is probably the first thing most people think of; but there are other simple, little things at home that can help save money.
There is a big difference between cheap and frugal, but we most definitely qualify as the latter.
Don’t let that money fly the coop, take advantage of some of these easy tips!
Plan meals – Backwards
One of the things that can be done to monetize groceries at home is planning meals. Yes, meal planning. You’ve heard it a gazillion times, but who has time for that, right?
That’s why I meal plan – backwards. Backwards? Just keep reading and it will make sense.
Who has time to plan meals and then go grocery shopping accordingly?
Well, meal planning backwards allows you to buy groceries according to weekly ads. Even if not using coupons, shopping sales ads helps the budget.
Let’s get started!
- Pick any day of the week that works best for your schedule, grab a notepad and head to the kitchen; this won’t take long, I promise.
- Open the refrigerator and start with perishable items.
- Vegetables are first to go bad when not used; and let’s face it, that head of cabbage always gets lost in the bottom of the drawer somewhere.
- Write down the things that need to be used in the next 7 days, i.e. squash, lettuce, cabbage, or any leftovers you may have.
- Check your freezer next, any meats or breads that you can incorporate?
- Lastly, let’s see what’s in the pantry. At this point you should have a few meals in mind already.
- Write down meals in no particular order on your weekly schedule. Have this visible in your kitchen somewhere; on the fridge or the wall on a dry erase board, like I do.
- Give yourself a freebie with either a dinner out, delivery or a leftover night. Don’t put too much pressure on yourself.
- Don’t worry if Monday’s planned dinner doesn’t get made that day; move around on your weekly schedule to fit your needs and wants.

Wasn’t that easy? Only using one pre planned meal that week can make you feel accomplished in saving money. Less food wasted = less money thrown away, right?
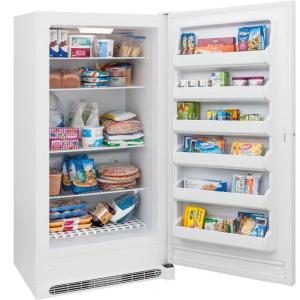
Freezer – your new best friend!
Now let’s talk about what to do if perishable items can’t be used in time.
The freezer can be your best friend if utilized properly. Did you know that you can freeze any fruit or vegetable?
Buying a stand up deep freezer is one of the best investments there is. Personally I do not recommend a chest deep freezer, as things can get lost in the bottom; or even squished if items are fragile.
Organizing and finding things is much easier in a stand up freezer; even with the little baskets available for the chest type.
If the short, chest freezer works for you, then kudos; because I have tried and failed miserably at using one.

Vegetables
- Slice or dice vegetables and place in single layer on parchment baking pan (this prevents clumping together while storing).
- Place in freezer until frozen solid – at least 4 hours. I prefer overnight, just to be sure.
- Once completely frozen, divide into freezer bag or container.
- Vegetables can be kept in the freezer up to 10 months, so be sure to date your containers and bags.
- Mixing vegetables in portioned bags can make cooking a breeze; combine onions, bell peppers, carrots etc. for easy dumping into recipes like spaghetti or soups.


Vegetable scraps can also be kept for easy stock recipes. Onion peels, carrot ends, cabbage, mushrooms, even celery leaves and stalks can be kept in a storage container in freezer until ready for use (several cups is recommended for the most flavorful outcome). Any part of a vegetable you would normally throw away or compost makes a wonderful addition of flavor; play around with combinations – there isn’t just ONE way to homemade stock. Be sure to wash them before storing in freezer.

Stock and Broth Recipe coming soon !
Broth
Made too much broth?
Have some left over from store bought container? Save it for later!
With fall and winter around the corner there will surely be a need for extra broth for your recipes.
Simply divide into a silicone muffin pan or ice cube trays.
Once frozen solid, just pop into storage bag or container and keep up to 6 months in freezer.
Be sure to date all your food products.
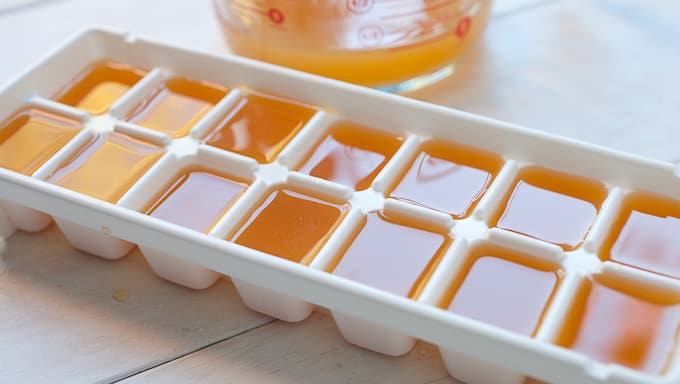


Broth can be frozen in two ways: divided into portions, as mentioned above, or it can be frozen in gallon bags. Since making smaller portions makes for faster thawing and easier adding to recipes as needed, I prefer the muffin pan method.
Fruit


What about fruits? No one ever eats them all before they spoil!
Just like vegetables, fruits can be frozen for later use. It is just as easy!
Wash and dry any fruit that you plan on freezing. For items like grapes and berries; just wash, dry, and place on single layer parchment baking sheet and freeze solid. This usually only takes about 4 hours, but I prefer overnight. These can be portioned and stored separately or together as well. I like to mix different variety of berries together for easy smoothie dump bags; or warm over low heat to top off ice cream, for a yummy dessert.
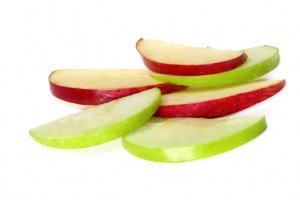
Fruits like bananas, apples, and peaches only need peeling, coring, washing, and slicing.
For apples, a lemon bath is recommended to keep from turning brown.
As before, place in a single layer on a parchment lined baking pan and freeze for at least 4 hours.
Mix and match or store individually. Portion according to your needs for things like cobbler, pies, or pancake recipes.
Grapes can be frozen whole, or divided in halves; either way, make sure to also flash freeze in single layer on parchment paper. It can be a wonderful, cool treat in the summer time; or add it to a glass of wine for a sophisticated touch.

Lemon bath – simply add 2 Tbsp. of lemon juice to 4 cups of water, soak fruit for 5 minutes then drain and let dry.
Fruit can be freezer kept for up to 1 year.
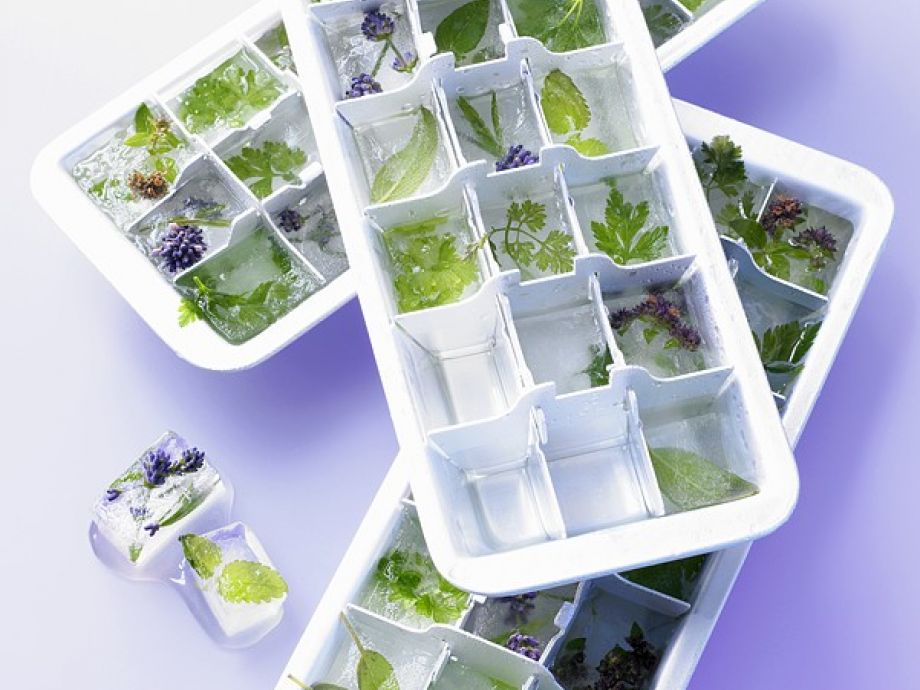
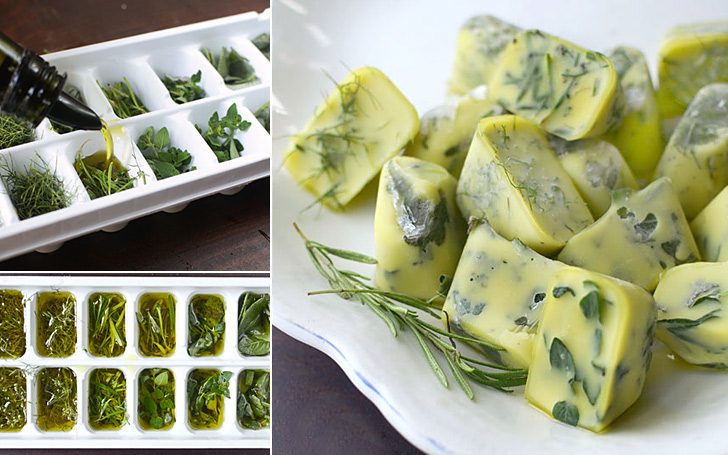
Herbs
Didn’t use all of your cilantro or parsley? Too many herbs from your garden to use? That stuff isn’t cheap!
Freezer to the rescue!
Wash and chop herbs.
Divide into silicone muffin pan (my favorite vs the ice cube trays since its compartments are larger)
Top off with water, broth, or olive oil and put in freezer.
Once frozen solid, pop out and place into your choice of freezer storage.
Make sure to date and use within 12 months.
Breads
A lot of people are skeptical when it comes to freezing any type of bread.
Personally I have never had any trouble with it being soggy or hard after thawing out. The most important thing to remember is to let it thaw completely before using; if not, chances are it can become soggy. Do NOT thaw in microwave; this can increase the chances of becoming soggy or rock hard! It really is a gamble.
Bread Crumbs
Should your bread get stale before you get to use it, DO NOT throw it away!
Throw it in your food processor or just dice it up and toss it in a freezer bag. You can use this later for cornbread dressing, pasta toppings, casseroles, breaded vegetables and so much more.
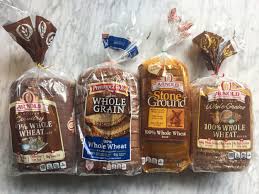
Cheap Bread
Look up reduced bread stores in your area; independent vendors. This is a good way of getting your hands on cheap bread. Make sure to check the dates as these are often close to expirations. So, either use it soon after purchase or put in the freezer for later.
Loaves and other bread items can be frozen as is; whole, in the original packaging. If you want to divide into smaller packs you may do so, just make sure you are using good freezer storage bags. Also, you can simply remove what you need from the original package and thaw on paper towels.

Not only can bread be frozen as is, in original packaging, it can be prepped for things like garlic bread or even PB&J sandwiches.
Breads can be stored in freezer 3 to 6 months, no matter the expiration date. Always date the packages with frozen and expiration dates. This is the most short term item, and although it is good for up to six months, it can start losing flavor at around 1-2 months.
Toodles – for now
Well, that is all I have for now; I can’t spill all my beans in one post, right?
Tune in next week for more tips on stretching your dollars into pennies – and more recipes to come as well!
Toodles!
Recent Comments